Friday, September 26, 2014

"Martha"- A Martha Bishop Rag Doll

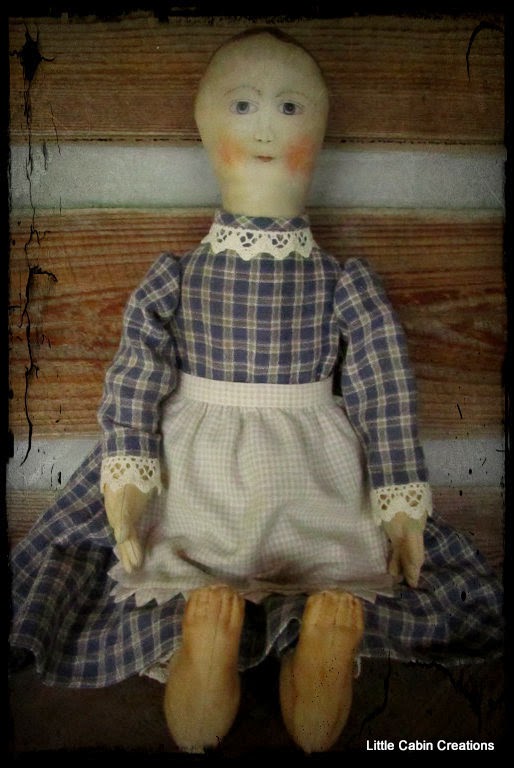
I've finished stitching the clothing & bonnet for
 the rag doll made by Martha Bishop.  I've been 
calling her the "Martha doll" for so long, the
name has finally stuck.  So, let me introduce 
"Miss Martha".
 
Her face is reminiscent of the fine antique
 painted dolls.  She has a soft aged patina
& a sweet countenance.
 
 Dolly curls.
  Her dress is made from a vintage
homespun that Martha sent along with the doll.
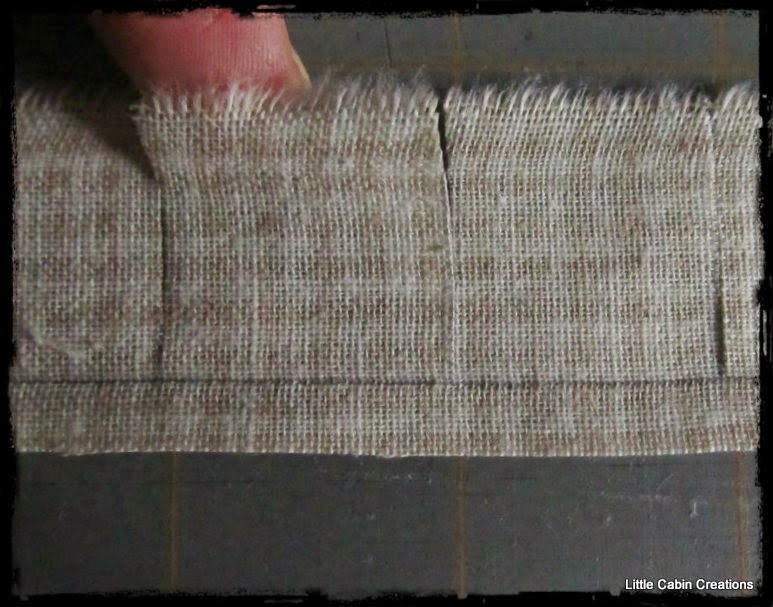
  The fabric is so soft.  I did cartridge 
pleating & removed the basting stitches rather
than leave them in.  I used the same
wool lace as I used on the under garments. 
 Her fingers and feet
are so prim.
 
I nearly sewed the clothing onto Martha,
commonly done with old dolls, but
she actually has modern snaps underneath
the buttons.  I have a feeling Martha is going to
receive a great deal of attention, when my 
great niece visits.  Miss Ava loves to take a
 dolly's clothing off!
These are old worn painted wooden buttons
are from my friend Cinders button box.
 Her apron is a homespun mini check
with double Van Dyke trim.
Here's the link on how to make this trim.
Apron With Double Van Dyke Trim 
 
 She has plenty of undergarments, plain & fancy.


 I couldn't bear to cover these adorable feet.
I stitched a simple unlined Italian straw poke bonnet.
The silk ribbon is a chestnut brown, but it doesn't
show up properly in these photos.

She is a fine addition to the cabin.
Thank you Martha, she was so much fun to dress!
Martha Bishop Originals
~~~~~~~~~~~~~~~~~~~~~~~~~~~~~~~
Here are some of my favorite antique
one of a kind "rag" dolls.  To me, it's
fine folk art & nothing about these
dolls was raggedy when they were made!

MAIDA TODAY 

Theriaults
  
Britannica Kids

AAAWT Main House Auctions
 
EBAY 

EBAY

Skinner 
Countryandshakerantiques 

AAAWT

Happy Day!

Saturday, September 20, 2014

The Back Stitch & Half Back Stitch


I sew my seams in the back stitch and baste my gathers 
with a loose back stitch, that way every gather gets caught. 
I love the back stitch.  It's easy to sew, it makes a very strong 
seam.  I've drawn a seam line on some linen and I'm using a
 button hole thread just so it shows up well.
~~~~~~~~~~~~~~~~~~~
How to sew the full back stitch.
Knot your thread and insert your needle from
 underneath, a stitch away from the beginning of the 
seam line.  Pull the thread all the way through.
Insert the needle to the right, one stitch away,
 on the stitch line.
Bring your needle out, one stitch away, to the left.
This makes the first stitch on the seam line.
Insert you needle in the left side of the first stitch,
the same hole the thread is in.
Bring your needle out one stitch away to the left.
Pull your thread through
Now there are 2 stitches.
Keep repeating.  I "get a rhythm" when sewing this 
stitch.
This stitch looks very neat on top.
However, it's not too pretty on the back, but
it's a solid strong stitch.
To tie off your thread, on the back side,
put your needle through a couple of threads,
 wrap your thread around the needle a couple times
pull tightly and clip the thread end.
This is how it looks from the inside.  If you try
to pull this seam apart, the fabric will tear.
This is how to make a half back stitch.
Bring you needle up from the back.
Insert your needle 1/2 stitch to the right.
Bring it out a full stitch away to the left.
Insert the needle a 1/2 stitch away to the right.
Bring it out one full stitch away on the left side.
Keep repeating and get you rhythm going
and you'll make nice even stitches!
Both stitches are very neat looking and strong.
Sew easy.  Give it a try.

Saturday, September 6, 2014

Apron With Double Van Dyke Point Trim

I've finished an apron for the prim doll
by Martha Bishop, trimmed in Van Dyke points.
Today it's more commonly known as prairie
points or saw tooth trim, but it's been around
a long time.  Van Dyke point trim can be
done several ways, I call this a "double point".
I thought you might like to see how I made it.
 This is a 3 inch wide strip, long enough to
go around the edge of my apron body.
(In my case about 23 inches.)
I folded it in half & ironed a sharp crease.
(Wrong side is on the inside of the fold,
I'm using a reproduction homespun that
looks the same on both sides)
Opened it up.
With my pencil I marked 1 & 1/2 inch increments 
along the bottom half section.
(Mark on the wrong side of fabric)
On the top section, I started marking
the 1 & 1/2 inch increments halfway 
between the ones on the bottom.
(note the 2 black dots)
This is how it looked when all the marks
were done.
I then cut each line, just to the crease.
As you see below, the little sections 
are squares.  
This is the one rule that must
be followed.
I started with a 3 inch strip, folded it in
half.  That makes it 1 & 1/2 inches wide.
My sections are 1 & 1/2 inches.......a square.
So, you can make this trim any width you
want, tiny for a trim, big for a quilt,
just make sure the sections are square!
I started by folding the first square on the
top row, to the left, forming a triangle.
 (Ignore that first little half section).  
I finger pressed it.
Next, I folded the section to the 
right,
making the first complete triangle.
I pinned it in place.
I moved to the next square and repeated.
The top row is all folded and pinned.
I pressed all the triangles.
~~~~~~~~~~~~~~~~~~
FYI
At this point you've actually made a single
continuous Van Dyke trim.

  For example,
use a 1 inch ribbon, make 1 inch squares,
just don't cut all the way to the edge.  (Ribbon
that has a finished edge is best).  For fabric, cut the
 width about 1/4 inch wider than needed.  Mark
the correct width along strip with a pencil and cut
your squares to the mark.  That way your trim stays
together while you work with it.

 
 ~~~~~~~~~~~~~~~~~~~
Next is the bottom row.
I folded the first square up and to the
 left forming a triangle.
Finger pressed.
Folded it to the right, making
the first complete triangle.
Time to deal with that odd little
piece we ignored!
I folded the odd piece over to the right
& trimmed it off.
Pinned it together.
Then folded the triangle up, even with the
first triangle on the top row & pinned it.
Repeated with the second square 
on the bottom row.
Till they were all done.
I pressed the triangles.
I'm using homespun fabric that's heavy
for making this type of trim in a small size.  
To reduce bulk, I opened up each square,
and trimmed the inner triangle.
These are the five pieces for the apron.
I pinned the trim in place, right sides &
raw edges together.
Basted it down.
 
I checked the right side to make sure
all the folds were in place.

This narrow strip will become the hem.
I folded under 1/4 inch toward the wrong
side & pressed.
Placed it on top of the basted trim with
right sides and raw edges together.
Here, I have folded it back so you can
see how it looked inside.  
Basted in place.
I sewed it with a back stitch,
removed the basting stitches
and trimmed the seams.
 
I folded it toward the back side and
whip stitched the hem down.
This dolly needs a work apron,
she's very messy with the flour when
she bakes.  So, the waistband needs to
go all the way to her sides for a 
side swipe apron.
 
I used 2 basting rows for gathering.
This is the waistband with 4 pressed folds.
The top row will be the stitching line
for attaching to the body of the apron.
The 2 apron ties will be attached on
the side edges.  Note the 2 black dots.
(I just figured out how to write on my
photos......what fun!)
Right sides and raw edges together
& stitching done.
Below you can see where the finished
ties are attached.  Here is a link to
making tie ends with a point.
Ties For An Apron 
Make sure both ties will be to the right
 side when the waistband is folded toward the 
back.  You can see where I made a fold in the 
ties, as they are wider than the waistband.
Fold the waistband to the back side.

To reduce bulk, I removed the top
1/2 triangle and trimmed away as
much fabric as possible.
The back side sewn down.
Finished!
 Van Dyke trim can look prim or very fancy
depending on the choice of fabric or
ribbon & it's sew easy to make.
Give it a try!
~~~~~~~~~~~~~~~~~~~
This is a post on the history of
Van Dyke Points.
Jane Austen's World-Van Dyke Points In Regency Fashion

See some of Martha's rag dolls here:
Martha's Dolls-Rag Dolls