Fairy makin' takes lots of time & patience.
I basically followed the directions in the book
"Felt Wee Folk" by Sally Mavor, with just a few
changes. My fairies are an inch taller at 5 inches.
I used 3 pipe cleaners & made their bodies &
arms a little longer.
I basically followed the directions in the book
"Felt Wee Folk" by Sally Mavor, with just a few
changes. My fairies are an inch taller at 5 inches.
I used 3 pipe cleaners & made their bodies &
arms a little longer.
As most of you know, I have little talent for
painting, but I've never let that stop me from
trying. At least they look happy & they can
certainly see well in the moonlight with those
big eyes!

I made do with embroidery thread for the hair
instead of the suggested wool fleece. I glued a
small row of bangs from short pieces of embroidery
thread onto the painted head. I stitched long pieces
of thread together with a back stitch, then glued
painting, but I've never let that stop me from
trying. At least they look happy & they can
certainly see well in the moonlight with those
big eyes!

I made do with embroidery thread for the hair
instead of the suggested wool fleece. I glued a
small row of bangs from short pieces of embroidery
thread onto the painted head. I stitched long pieces
of thread together with a back stitch, then glued
that on top of the bangs & head.
I trimmed the ends evenly, then braided. (I had
difficulty braiding tight braids, fairies are squirmy
& my fingers are stiff.) I used embroidery thread
for the ties and bows.
& my fingers are stiff.) I used embroidery thread
for the ties and bows.
Those teeny seed beads were like jumping beans,
I had more on the floor than on the fairies! The
directions called for small lily petals as wings, but
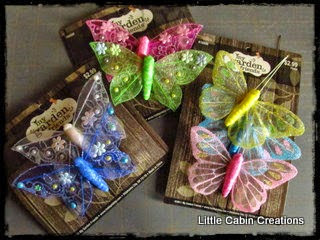
I saw these butterflies in the floral department &
thought they would make sparkly wings.
I bought 2 sets of each color.
I carefully took them apart & removed
the wire inserts, then glued 2 sets together
to get one set of wings.

They were just the right size. The wings
below were stitched directly onto
their tunics.
These wings were inserted thru small
slits in their tunics, then stitched & glued
to a small piece of wool felt. This technique
looks much neater & the wings lay flatter.

I traveled to northern Missouri to attend
our annual girlfriend's get together this past
weekend; hosted by Cinders. I took the latest
fairies for our little gift exchange.
I had these large German paper mache eggs
with colorful farm scenes. They made the
perfect home for the wee country fairies.
Be sure and stop by Bittersweet Needle & Thread
to see Cinders post on our fun weekend. We took a day
trip to St. Joseph, Mo. for lunch and the museums.
Nothin' better than a weekend with your best pals!
~~~~~~~~~~~~~~~~~~~~~
This project was lots of fun, but a challenge for
my old hands and eyes! My fairy makin' days are
over for now.............. I'm catchin' some city
fairies for the second dollhouse!
I had more on the floor than on the fairies! The
directions called for small lily petals as wings, but
I saw these butterflies in the floral department &
thought they would make sparkly wings.
I bought 2 sets of each color.
I carefully took them apart & removed
the wire inserts, then glued 2 sets together
to get one set of wings.

They were just the right size. The wings
below were stitched directly onto
their tunics.
These wings were inserted thru small
slits in their tunics, then stitched & glued
to a small piece of wool felt. This technique
looks much neater & the wings lay flatter.

I traveled to northern Missouri to attend
our annual girlfriend's get together this past
weekend; hosted by Cinders. I took the latest
fairies for our little gift exchange.
I had these large German paper mache eggs
with colorful farm scenes. They made the
perfect home for the wee country fairies.
to see Cinders post on our fun weekend. We took a day
trip to St. Joseph, Mo. for lunch and the museums.
Nothin' better than a weekend with your best pals!
~~~~~~~~~~~~~~~~~~~~~
This project was lots of fun, but a challenge for
my old hands and eyes! My fairy makin' days are
over for now.............. I'm catchin' some city
fairies for the second dollhouse!


What a lot of thought and work you put into your fairies. I love my little Buttercup. I hope she will be happy in her new home. I had so much fun with you and Teresa. Can't wait til September.
ReplyDeleteThese are the sweetest little fairies. I like the lovely tunics and flower pedal skirts. The embroidery thread worked very well for the hair and even though you may not paint, you did a lovely job on the faces.
ReplyDeletebeautiful fairy's, all of them. The eggs were the perfect size to fit them in. Lots of thought and preparation to make these little people. You did a great job on their painting. The eyes are pretty and freckles and a big smile too. The dresses with the flower petals are wonderful. Working on such a small scale is hard, but you wouldn't know it to look at all these beautiful little fairy's.
ReplyDeleteWhat wonderful gifts for the friends! I love the German paper mache eggs...perfect home for the wee little ones.
ReplyDeleteThese are certainly sweet little things! And they do look happy even though someone said she couldn't paint; I think we're always our own worse critics. They're perfect! Anxiously waiting to see the city fairies!
ReplyDelete