Monday, April 29, 2013

Cora Bea Butternut

Some months ago I submitted Cora Bea Butternut,
to the bride challenge at Art Doll Quarterly magazine.
I gave her explicit instructions to stand tall and shine!
She must have done so, as she has been chosen
to represent the Ozark pioneer bride.
 Many of the early Ozark mountain pioneers
were of Scotch Irish decent, hence the red
headed bride.  Cora would most likely have been 
married in a little log church, or perhaps at home,
by a traveling preacher.
 
She would wear her best day dress.  If it could be 
afforded, a new dress from store bought cotton calico 
would have been hand sewn for her.  Her wedding dress 
would be worn for many years to come, on other
 special occasions.
 She would make new undergarments of 
fine muslin for her wedding trousseau.
 
 Perhaps she would purchase a new straw poke 
bonnet that she would line with muslin and adorn
 with a silk ribbon, truly and extravagance for an
 Ozark pioneer bride.
 
 Cora's family would most certainly have recorded
 her marriage in the Butternut family bible, along side 
the other important family events.
Be sure to pick up a copy of the May issue.  Lots
of interesting dollies!

Friday, April 26, 2013

Bake A Dolly?

Doll maker Martha Bishop makes the most
wonderful folk art primitive rag dolls.  She kindly
sent me a finished doll body and 2 dolls ready
to be stuffed, as well as the directions for baking
and aging my 2 dolls.  You can see her beauties at
Martha's Rag Dolls
 I love Martha's simple primitive faces.

It was so much fun to get right to the stuffing
and face sculpting, although I think my faces
look a bit more like space aliens or scary demented
clowns than folk art primitive dollies!
I've baked lots of cakes, cookies and pies in my day,
but never a dolly!

 Her recipe includes a mixture of strong tea, cinnamon, nutmeg
and ginger, that is brushed all over the dolls bodies.
 
 Then baked at a low temperature, turning every 15 minutes.
 
I was so tempted to serve one to
my hubby for dinner!
A light brushing and some fine sandpaper gives them a
lovely aged look.  They smell good too.
Well, they didn't turn out too bad.
What shall I make for them to wear?
I envision a scrappy red dress and a
patriotic Uncle Sam or perhaps an Abe Lincoln.
This bevy of beauties has certainly been causing
a ruckus in the doll room..........

Happy Sewing Baking!

History Of The Three Wise Monkeys-Mizaru,Kikazaru & Iwazaru

Thanks Martha, It was a fun challenge to get out of my box
and attempt something different!


Wednesday, April 24, 2013

On The Lighter Side......

I thank each and every one of you for your
 kind encouraging words.  
~~~~~~~~~~~~~~~
I'd like to share my sister's favorite 
Irish blessing,
 and her favorite Irish curse................
Be at peace.

Monday, April 22, 2013

My Little Sister

I am so sad............

Debra (Debbie) Lea Rittershouse, 55, left this life on Sunday, April 15th at her home in Niangua.  Debbie was preceded in death by her father, Paul Rittershouse.

Debra is survived by her mother, Aletha Coulter; one son, Travis Williams and his wife, Kristen; her grandson, Landon Williams; one sister and one brother, Sherri Farley and David Rittershouse; her niece and nephew, Leann and Alex Farley; And last, but certainly not least, her partner and love of her life, Robert Comer with whom she lived very happily; and a host of friends and family.

Born to Paul L. Rittershouse and Aletha (Rittershouse) Coulter, Debbie earned her nursing degree at St. John's School of Nursing and worked as a hospice nurse with Hospice Compassus in Springfield.
Prior to that she worked in the ICN (Intensive Care Nursery) at Cox Medical Center.  She was hard-working and compassionate and cared deeply for all her patients. She always personally made sure they were treated with respect and dignity in their final days and did whatever was needed to see that they were as comfortable as possible. She even attended many of her patients' funerals after their passing. Debbie also made front page in Springfield News-Leader in 2011 for saving a woman's life who had been in a car accident. Debbie was driving to visit her mother when she happened upon the accident where a woman in the vehicle was unresponsive and had no pulse. Debbie pulled to the side of the road and administered CPR. She knew when the color returned to the woman's face, that the CPR was successful and that she was going to live. This is just one of many examples of Debbie's nurturing character and love for her job. Her patients always adored her and she loved them.

Debbie was extremely trusting and always put others before herself. She was an amazing daughter, sister, mom, granny and best friend. She enjoyed working in her garden and always loved to post pictures of the many varieties of vegetables she grew and flowers she had planted. Her favorite flowers were Japanese Irises. She enjoyed nature and the peacefulness of the outdoors. She had a zest for life. She had a passion for animals and had many of her own. She could never turn away a stray or mistreated dog or cat and she especially loved the chickens that her partner, Robert had helped her raise and built her a new chicken coop for. She took a special interest in their bee hives as well as learning to make fresh honey from the hives. She and Robert also loved wine-making and experimented with a variety of fruits and even homemade wine from honey!

Debbie was passionate about motor cycles and loved riding on the back of her boyfriend's Harley Davidson with him. She was a free spirit and had a great sense of humor. She was certainly not ever afraid to speak her mind. You never had to guess what was on Debbie's mind because she would tell you before you had a chance to ask. Debbie dreamed of going to Ireland, which she did in 1996 when her niece's dance troupe was invited to participate in the St. Patrick's day parade in Dublin.  On her birthday she kissed the Blarney Stone at Blarney Castle, giving her the “gift of eloquence” (or gab). She also loved shamrocks and anything that represented her Irish heritage. She was proud to be Irish and relished the Irish lifestyle. She never turned down a chance to have a good laugh and a good brew with her friends and family. She was extremely fun to be around. Everyone that knew her knew that where Debbie was, there was bound to be fun! With her long, beautiful, curly, red hair and fair skin, she loved to go to venues with Celtic Irish music and was always first on the dance floor. She always helped anyone close to her whenever they were in need and did so with no expectation of a returned favor. She made the world a fun place and the people around her very happy.  She was not only beautiful on the outside, but on the inside as well. We miss her so very much already and will every day, forever.

Saturday, April 13, 2013

Mrs. Bufkins-A Wool Jointed Rabbit

It's definitely spring!  When I open the front
door, the bunnies scatter so fast they nearly
 blend in with the newly greening grass.
~~~~~~~~~~~~~~
So, I decided to work on a pattern.  Four bunnies
 later, I am almost satisfied with it.  She has antique shoe
button eyes and is made from wool.  The paw pads & inner ears
 are a soft pale sage ultra suede.  Now, Mrs. Bufkins is in need 
of some clothing and perhaps a spring bonnet.
A green rabbit?
  I am certainly in a spring mood!


Wednesday, April 10, 2013

It's Raining, It's Pouring.............

This morning started out at a beautiful 72 degrees.
This evening the temperature is quickly 
dropping and it's pouring.  The hubby
and I decided to have our after dinner coffee on 
the back deck.  To our delight we had a visitor
 stop by to wait out the heavy rain.  
 
We often see eagles flying along the creek just
below the house, but this is the first one to
land in one of the tree tops.
 No wonder this majestic bird is our 
national symbol!


Tuesday, April 2, 2013

How To Make A Scrappy Nine Patch Dolly Quilt


 I cut all my fabric scraps into strips and
put them in a box.  It was time to do
 something with them.  I decided on the 9 patch
 pattern for a couple of dolly quilts.  They are fun
and easy to make.  As much as I like to hand sew,
 I find quilt blocks slightly boring.  I sewed them
 on my machine.
  I cut my scraps into 1 1/4 inch strips.
That's rather small, they can be larger, but
I generally have small scraps.
~~~~~~~~~~~~~~~~~ 
Some of my strips were cut on the 
bias, some on the straight of grain.  I had
a mix of woven fabrics and cottons.  So, I
 knew before I started, that my blocks weren't
going to match due to stretch, nor would
they be exactly square when finished.
Just perfect for a scrappy quilt.
 ~~~~~~~~~~~~~~~~~
Besides, I don't want to waste this
 lovely fabric.  To me, the charm of a  scrappy
 doll quilt is in it's imperfections!
~~~~~~~~~~~~~~~~~ 
I paired up the strips.  I tried to
coordinate them by color.
Half of the paired up colors I put
together like this.
 The other half like this.
I was careful to have the prints going the
same direction.
 
 I sewed all my strips together then ironed
 the seams open.  When I make a scrappy quilt,
I use a medium gray thread.  It blends
 well with all colors.
~~~~~~~~~~~~~~~~~
 All seams are 1/4 inch.
~~~~~~~~~~~~~~~~
My trick for getting an exact 1/4 in seam,
is to ugly up my machine with duct tape.
It's thick and creates a raised surface
 the fabric butts up to and slides along easily.
  Goo Gone removes the sticky when I'm done.
 
I use a small screwdriver to help guide the
 fabric as I sew along.
Then I cut all those strips into
1 and 1/4 in strips. 
(cut these the same width as the
original strips if yours are different)
 
Lots of little strips paired up.
 
Half of the matching pairs I pinned together
 in this 9 patch pattern.
The other half this way.
 
I sewed all the 9 patches together &
I ironed the seams open.  I love duct tape,
this is very easy, fast and accurate!!
 
The wonky ones,
I squared up.
The backs looked like this.
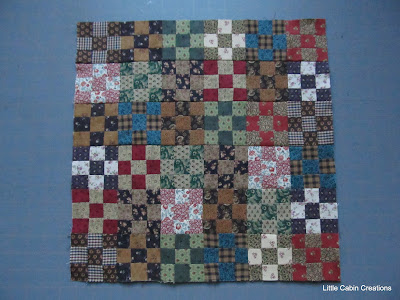
Lots of 9 patch squares.
I randomly laid the squares out.
6 squares across, 6 squares down.
(You can make place mats or a
table runner if you choose.)
 I sewed the squares together in each row.
This time I ironed the seams to one side.
 
Then I sewed the rows together.
I ironed the seams to one side.
I used a thin natural cotton batting.  It's on the
 verge of being a bit too thick for these small
quilts, but it's what I had.  I made do.
I have used flannel and even a section
of a worn out blanket before.
The backing is muslin.  It's best to
cut the back piece about 3 inches wider
for ease in stretching on a frame.  My scrap
piece wasn't that big.
Really, this is a scrap quilt!
I pinned the 3 pieces together pulling 
them tautly and basted it securely.
This small quilt could have easily been quilted
on my sewing machine.  It would have
been cute with yarn or embroidery ties
in the center of each block too.
~~~~~~~~~~~~~~~
Even though I hand sew a lot, hand quilting
 has never been my favorite thing to do, but I
can tackle a small dolly quilt.  I hand 
quilted the 9 patches with off white
 quilting thread in a very simple pattern.
The quilting stitch is just a running stitch.
Hide your knots withing the layers.  Use an
embroidery hoop or small quilting frame if you
have one.  
 This quilt was very small & I actually
 quilted it in my lap with no hoop or frame, but
 I had basted it very tightly.  However, it's best if you
 can stretch it on a frame of some kind.  If
you've never quilted before, a doll quilt
is a good first project. Hand quilting gives the
 quilt that extra charm, so don't worry
if your stitches are uneven!  
 See the corners that don't match.
Some of my lines and stitches are
a bit crooked.
I trimmed the edges and squared
it up.  You can easily see in the bottom
row how uneven this quilt is.
That's dolly quilt charm!
For the binding I cut enough 2 1/2 inch strips
to fit around the outer edge.
I  stitched them together.
Then ironed it in half, wrong
sides together.
I cut one end of the strip at an angle and
pinned the edges together starting
about half way down one side.  I
 started sewing on the binding at the
first pin on the left below, leaving
about 3 inches un-sewn.
I then sewed almost to the
first corner and stopped.
The photo below is about 3 stitches
too far, I had to take them out
to miter the corner.
I folded it up.
Then back down.
The inside of the fold
looked like this.
I then pinned 
and continued sewing the binding on.
I did this to all the corners as I
came to them.
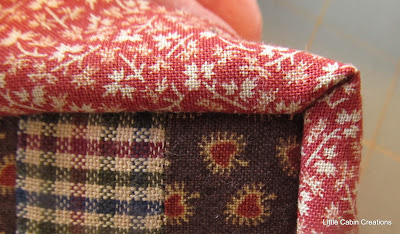
This is what a mitered corner
looks like.
When I came back to the beginning,
 I overlapped a couple of inches
and cut it off.
I folded under the edge & placed the
loose beginning end within
the fold.
Pinned and finished sewing.

I folded the binding toward the
backside, just past the stitching
line.  Notice how I have pinned it.......

No pin ends sticking out
to poke me.
except for the corners.
I folded & pinned those into
 a neat miter
To hem the edge, I hid the knot inside the fold

& whip stitched the binding just
above the machine stitching line.
The finished quilt is about 15 and 1/2 inches square.
Well, it's not perfectly square!
This is the second quilt.  I cut this
binding out of 3 inch strips.
 I quilted this one a bit differently.
(2 quilts and my fingers are sore.)
I made a big dent in the scrap box.
These little scrappy quilts certainly have lots
 and lots of  "charm" in them ...........& the
 dollies are smiling.
Happy Sewing!
My camera had a smudge on the lens, I
do believe it was probably frosting
from sugar egg decorating........oops.