Wednesday, April 25, 2012

Pity & Prudence Butternut

My little hands have been
 very busy sewing a couple of
"Butternut" dolls that are
 reminiscent of the earlier
 American cloth dolls. 
 
Pity is a simple Prairie or Pioneer doll.
  One look at her and she brings to
mind the covered wagon, the sod home on
the prairie, the log cabin in the woods &
 the adventurous American pioneer.
In my opinion this style doll is
truly the all Americn cloth doll.
 
Here she is next to a doll body that has not
been aged. Pity & Prudence were tea dyed
 and then over dyed with a solution made
 from crushed walnut shells.  This dye can
 be sprayed from a bottle or daubed on
with a cloth to achieve the desired effect.
Their clothing & bonnets were aged this same
way.  It is a natural dye, acid free & non toxic.
Poor "pitiful" dolly, her head is too big, her hands
are too fat, her legs too short & her body
is a bit stumpy.......hence her name!   However,
 those are the features that give the "make do"
 Pioneer doll such charm!
 Pity may be a simple style
Prairie doll but she needs a full
wardrobe!
Her underpinnings are sewn from muslin.
Her petticoat is lace edged and has a
hook & eye closure.
The pantalettes & short chemise have
tie closures.
 He dress is a wonderful deep blue and
rusty brown reproduction cotton fabric. 
The collar is lace edged; a lone
antique wooden 2 hole button with a
beautiful patina is sewn on the
front.  Hook & eye closures.
 Her brown calico Poke bonnet has button
 hole stitching around the brim.  Her apron is
linen.
 Pity and all her clothing are hand sewn
and aged for that well loved look.
I am fascinated by the early American
 cloth doll that is home made.
 It seems to me the earlier the doll the
 more highly detailed they are made.  Doll
 hair is painted, made from wool, fur and even
human hair is used.  Faces can be finely
 painted, drawn or embroidered. 
 Bodies are made from cotton, leather, linen
and stuffed with a variety of things.  The
clothing is detailed and reflects the
style of the day.  The majority of dolls are
 dressed to represent adults not
children or babies. 
Each is unique, made from no pattern,
and one of a kind....

Prudence is fashioned after that
type of early cloth doll.
 
  Her body is more proportionate.  Her arms
are slightly curved, her legs have stockings
 and shoes.  She has a simple embroidered face,
but detailed hair.  All elements I have
seen in early dolls.
Prudence wardrobe includes
a dress, petticoat, pantalettes,
and a straw Spoon bonnet.
Her underpinnings are sewn from cotton &
are edged with lace. 

 
 Her reproduction cotton plum print dress has a
 tiny lace edged collar & hook and eye closures.
 
 Her wool hair is plaited, and fashioned
into a small high bun.
 
I have hand stitched Prudence a spoon
 bonnet from fine Milan straw embellished
 with a vintage milliners ribbon.
 (1930's old store stock)
Prudence comes with a primitive
buttocks basket, handmade
by my good friend Teresa especially
for my dolls.
Prudence, her clothing & bonnet
are stitched by hand and aged for
that well loved look.

 Pity and Prudence will be available at
Early Work Mercantile May 1st.
Please stop by and see all the wonderful
early American offerings!

Monday, April 23, 2012

A Cozy Nest

I wanted to share this photo
 sent to me by one of the young
ladies I work with. While she and
her new puppy Wyatt were fishing
at the local lake they came upon 
this Canadian goose nest.

Wyatt was quite startled by the
unhappy parents but, he was
not harmed!
Thank you Tyler & Wyatt


Monday, April 9, 2012

Whimsical Animals


 More paper castings for my Brown Bag Molds
 page.  I've added a Whimsical Animals &
an Easter section.  About 25 more molds
to list and I'll have all of them
posted!!!!

Mrs. Cat
1988

Jemima Puddleduck
1997
Fredrick Warne & Co.
Brown Bag Hill Design

Mr. Rabbit
1988

Mrs.Rabbit
1989

Easter Egg-1988

Bunny With Pack-1988

1840's Straw Bonnet

I love bonnets, I suppose that's why
so many of my dolls wear them!     

This is my 1840's straw spoon bonnet
 that I wore when I went to historic
 art shows or historic re-enactments. 
(I rarely go anymore, I'm just getting
too old for that sort of thing).  
 Embellished with an antique 4 inch
 wide French silk ribbon in a
wonderful cinnamon color.
I purchased this spoon bonnet
from a company called
 "Just Two Tailors",they
have a wonderful selection
of historic straw hats and bonnets.
I used velvet flowers and leaves,
 vintage German spun cotton and composition
 fruits, berries, mushrooms
and vintage glass balls as decoration
for the bonnet.

 A small spray of flowers
on the inside too.
The interior is lined with muslin.
 The bavolet is hand crocheted.
You can see the functional ties.
Often the ribbon on a bonnet was
just for decoration.
Below are links to bonnets at the
Metropolitan Museum of Art.


http://www.metmuseum.org/collections/search-the-collections/80093996

http://www.metmuseum.org/Collections/search-the-collections/80044511


Saturday, April 7, 2012

Friday, April 6, 2012

Dolly's Handmade Straw Bonnet

I thought it would be fun to show you
how I made this little bonnet.
I started with a bonnet mold from
PNB Doll CO.  They have lots of molds
in all shapes and sizes.
They sell Swiss hat braid in several
colors. They also sell kits that come
with wonderful directions.
Here is a link to their store.
However,
I have several Italian straw bonnets in a natural color
that are just too large for the dolls I make.............so,
I decided to dye a couple tan, take them apart and make
a different bonnet.  Oh, how I love to
Make Do!
This is a great sight with links to doll supplies too.
This link is to the page that sells Italian straw,
I have purchased, since I published this post.
Look around her site.
Judith M Inc 
 These are the materials I needed to get started.
Mold
Glue
Straw
Double sided tape
Scissors
Thread (matches hat color)
Needle & bee's wax (keeps your thread from tangling)
I used glue from PNB Doll. It dries
fast, clear and is flexible.
 I intended to hand sew the entire
hat to make it more sturdy for child's play
so, I used the glue sparingly.
I started by placing the double stick tape
around the base of the mold, this will
 help keep the straw secure.
 I placed 1 row of straw at the mark
indicated on the side of the mold. (the mold is
marked on both sides) I added a thin row
of glue to the inner side of
the braid.
Then added another row of braid over lapping the
first row about 1/2.  Cutting the strip
at an angle on the end.
I continued adding several rows.
 As I added rows, I spread the ends out.  This
spreading allowed the direction of the rows
to curve toward the back.
 To make the hat come out even, I
overlapped the rows to the front more. 
I continued adding until the rows
met in the back.
 I started with a new row, coiling around,
 no longer cutting the braid.
 I continued coiling, gluing, overlapping
 and pressing down.

When I reached the middle, I left a small hole.
I cut the straw about 1 inch long and tucked it
 through the hole to the inside of the hat. 
 I glued this down.
This is what the hat looked like.
I carefully removed the hat from the mold.
 Trimmed the edges with my scissors.
I put the hat back on the mold, added
a bead of glue all around the top
of the outer edge & added 1 row
of straw matching in the back.
I cut the braid so it matches neatly.
I did the same to the inside
of the hat.
 I added another row to the
outside of the hat. This made a
nice finished look to the
bonnet.
At this point I hand stitched
the entire hat. The hat is done,
ready to be embellished!
These are items used I used 
to decorate the dolly's bonnet.
Floral tape
Wire cutters
Velvet leaves (cut down into tiny leaves)
Vintage composition berries
vintage spun cotton mushrooms
Velvet flowers
Thread and needle
Silk ribbon
Some scissors too!
More decorations than I needed
but I wanted plenty to choose from!
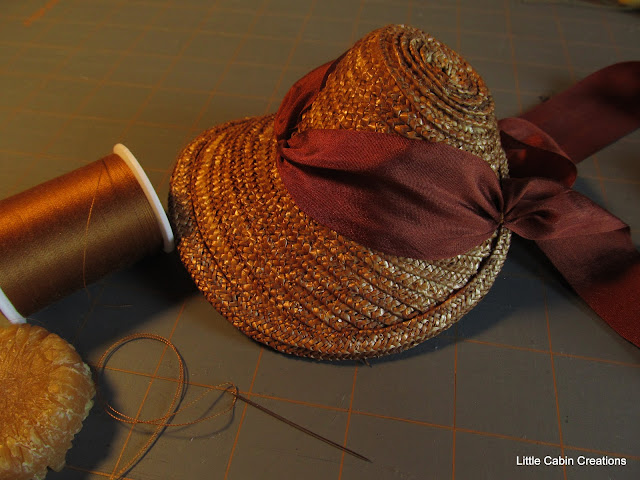
I started by attaching the ribbon
to the front of the bonnet,
sewing it down.
 The doll that was going to wear this
 bonnet had pigtails. I attached the ribbon
 ties low to the back of the hat, so the
bow could be tied close to her neck
and not interfere with her braids.
I then added small loops, folding up the ribbon
and sewing them down.
 I had plenty of this ribbon so I
added another loop to both sides.
(I refuse to waste even 1/2 in of silk ribbon)
I chose several flowers, berries, 1
 mushroom and wrapped them
 together with the floral tape.
I sewed this bouquet to the center top
of the bonnet.
The bonnet is done!
You might be wondering why I would
add red berries to this hat. Matching is really
a modern concept! Besides, I like to
make do with what I have! 
This was a fun project.  A special
hat for a special doll.
The work was tiny and a bit tedious,
but well worth the effort!
This is a wonderful book by Denise Dreher.  
I purchased it when I was doing reenacting. 
 Here is a link to her site.