The inside of the Victorian sugar egg
was often decorated with paper diorama
was often decorated with paper diorama
scenes. I used to meticulously cut scenes
from Easter cards. I stopped by the
scrap book section at Michael's.......
I was in paper heaven!
scrap book section at Michael's.......
I was in paper heaven!
When I unpacked the egg molds,
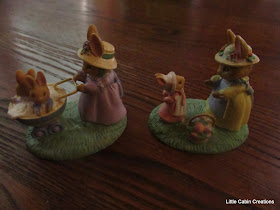
neatly wrapped in tissue, I discovered these
brand new cute little Easter figurines.
They are probably vintage now!
brand new cute little Easter figurines.
They are probably vintage now!
Old fashioned chicks too. It's such a treat to
find something I've completely forgotten
about!
I have the little eggs I made from sugar paste,
I am set to go. I purchased a bag of
Cadbury candy coated small chocolate eggs,
but I ate those while I was making flowers.
Construction Royal Icing
I am set to go. I purchased a bag of
Cadbury candy coated small chocolate eggs,
but I ate those while I was making flowers.
Construction Royal Icing
3 egg whites
3 teaspoons (slightly heaping) cream of tartar
Enough powdered sugar to make a very stiff frosting
~~~~~~~~~~~~~~
This frosting can be made in any
combination. 1 egg white, 1 tsp.
cream of tartar and enough powdered
sugar to make a stiff frosting, etc.
~~~~~~~~~~~~~~~
Store unused frosting in an
air tight container and refrigerate.
Beat the egg whites to stiff peaks.

Add the cream of tartar.

Beat together and begin adding the powdered sugar.

Add the cream of tartar.

Beat together and begin adding the powdered sugar.
Beat and add powdered sugar until it's very stiff.
I use 2 piping bags, green coloring and 3 tips
to decorate the inside of my eggs.
to decorate the inside of my eggs.
Large circle tip #12
Border tip #18
Grass tip #233
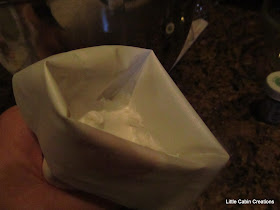
A little lesson on filling your frosting bag.
Place the coupler in the bag.
Place the coupler in the bag.
Add the circle tip and screw on the cap.
Load the bag with white frosting.
Roll down the bag and then add the frosting.
Rolling up the edges as you go.
Roll down the bag and then add the frosting.
Rolling up the edges as you go.
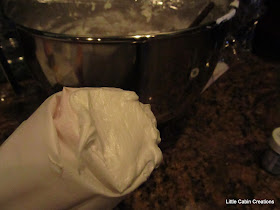
Keep the end covered when not in use to
keep it from drying out.
Same with the bowl of frosting.
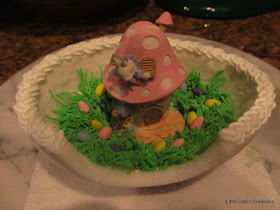
I am using the mushroom house for this egg.
I sat it in the empty shell to see if the height
was right.
I sat it in the empty shell to see if the height
was right.
it level. I let this dry a couple of hours.

A perfect fit.

I colored some frosting green and attached the
grass tip to a second bag.
Grass is fun to make. Hold the bag
straight up and down. Touch the tip
to the foil.
Squeeze and lift at the same time.
Stop squeezing and continue to pull
up.
I made grass all around the edge.
It doesn't have to be perfect.
Bunnies don't mow their grass.
Then I marked where the figurine would sit.
I used frosting to secure the house down.
Then I added grass around the base.
I used tweezers to push the little eggs in place.
For this egg I had room to add the paper picket fence.
Mother and daughter have little Easter bonnets.
How cute is that?
~~~~~~~~~~~~~~~~
For the paper pieces I added extra grass in the back
to help them stand up straight.
Using white frosting and the small border tip
I piped a small border all along the edge of the egg.
Just place the tip on the edge and gently move the tip
from side to side as you squeeze & move along the edge.
I use a turn table when decorating, if you don't
have one just set your egg in a plate and gently
turn it as you are piping.
Place the top shell on the bottom shell,
carefully lining up the peep hole & edges.
With a dull knife I scraped the outside edge smooth.
On the inside you have a nice little pattern.
Much prettier than an uneven line.
I let my eggs dry over night.
Royal frosting dries as hard as a hockey puck.
It's almost impossible to fix something inside an
egg that gets dislodged. Patience.
Odd but interesting.


I am enjoying this tutorial so much, thank you Sherri. Your pictures are wonderful and I can't wait to see them all finished. Such a talented woman!
ReplyDeleteThere's a great amount of work in your fabulous sugar eggs (and in the posting). You do have a talent for working on such a small scale. Thanks for spreading the fever...spring fever!
ReplyDeleteIt has been such fun to see how you create these amazing eggs!
ReplyDeleteThanks for sharing the process.
I'm in total awe!!
another amazing step in making the eggs. I've never made anything like this, but they are just beautiful and take a pretty good amount of experience, which you have along with a lot of talent in design and working with sweets. thanks for taking the time to show us how this is done. So beautiful.
ReplyDeleteI'm just totally amazed at your talent and patience to do all this intricate work. Very beautiful Sheri. These eggs are gorgeous.
ReplyDelete