I'm ready to assemble the house.
~~~~~~~~~~~~~~~~~~~~~~~
I made this batch of frosting
extra stiff, that way I have
no trouble putting my sides
together. Truly, this frosting
is like super glue!
~~~~~~~~~~~~~~~~~~~~~~
I needed more frosting. I added
the saved frosting, when I
started adding the powdered sugar
to the new batch.
~~~~~~~~~~~~~~~~~~~~~~~
I made this batch of frosting
extra stiff, that way I have
no trouble putting my sides
together. Truly, this frosting
is like super glue!
~~~~~~~~~~~~~~~~~~~~~~
I needed more frosting. I added
the saved frosting, when I
started adding the powdered sugar
to the new batch.
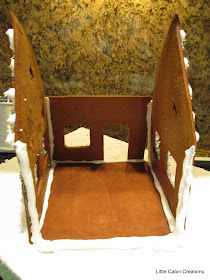
I made a big fat log along one side
and the back of the bottom piece.
On the side piece, I made a log on
the edge that will butt up to the
back piece.
I put it in place and added the back
piece. I then took a picture,
thank goodness for cement frosting!
This is how the outside looks.
This is called gappyosis.
I made a big log around the remaining
2 sides of the bottom piece and a
log on the edge of the second side piece
and butted it up against the back
piece.
I made a log along the exposed edges
of the side pieces and attached
the front section.
To fix gappyosis, just make
snowballs or logs and fill in.
The inside doesn't look very
decorative.
So, I squiggled some logs along
the sides
and bottom edges. This part really
isn't necessary, but hooray for
small hands.
I almost forgot to put the Santa
and tree inside.
I let this dry a few hours.
~~~~~~~~~~~~~~~~
Patience!
~~~~~~~~~~~~~~~~
Time to attach the roof pieces.
I looked around for something just
the right height for propping the
roof pieces in place. A can of Green
Giant corn with 4 napkins folded is
just what I need.
I squiggled logs on the 3
edges of the roof
put the roof piece in place.
Same thing for the other side.
I used Libby's spinach and
4 napkins.
Severe gappyosis.
I made a big wide squiggly log
all across the top.

I gently flattened it out with
my finger.
The doorways are already
set up, so I did a bit of
scraping.
I put a small log in the doorway
and a few blobs on the back of
the door
and set it in place. I did the other
door too.
Use your pastry brush to sweep
away wayward cinnamon, scrapings
or nonpareils. The frosting on the
base is hard and dry. I decided to
shorten my out building
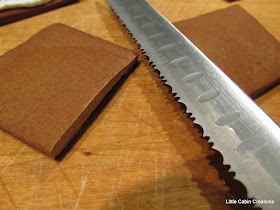
to make a little dog house.
I used a serrated knife to saw the
bottoms off. Not recommended
for the wee ones.
I assembled it the same way
as the big house.
~~~~~~~~~~~~~~~~~~
"Well, Watson, we can but possess
our souls in patience and see
what the hour may bring."
Sherlock Holmes
I let them dry overnight.
~~~~~~~~~~~~~~~~~~
Now that the buildings are
rock hard, no need to worry
about knocking them over.
I have switched to my star tip.
I made a large squiggle on one
side of the roof.
The other side and bottom too.
I did the same to the other side.
The sides.
The eaves. Anywhere I
thought it needed frosting!
This parts fun.
I made a big squiggle all across
the top. Oops, that drooped.
Some little stars around the door.
With the circle tip I made snowballs
around the edges of the sides.
I added bushes and shrubs
all the way around. Corners too.
Then I made snowball drifts all around.
I wanted stoops for my doors. I cut
candy cane sticks in the size needed.
and glued them down.
More snow drifts.
This corner is finished and ready for
a tree.
The tree peels right off the foil.
It's so hard I don't even break a
star tip.

This corner is very close to
the edge, so I made sure to save
room for my candy cane fence.
I did the same thing to the
to the dog house, except my
hubby couldn't resist the big
gumdrops so it has mostly
snowdrifts.
Out of frosting again.


This is very nice! I admire!
ReplyDeleteIt is a beautiful house. I'm diabetic and not supposed to get suger, so it's extra tempting for me.
ReplyDelete