Happy Easter!
▼
Sunday, March 24, 2013
Friday, March 22, 2013
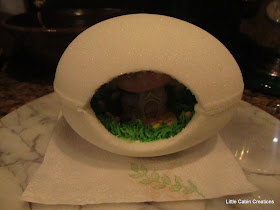
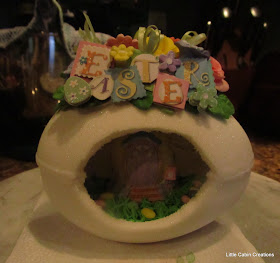
Finished Easter Panoramic Sugar Eggs
The eggs are ready
for the Easter bunny
to pick up!
Miss Audrey
for the Easter bunny
to pick up!
Miss Audrey
I was especially happy to make the egg
above. It goes to Miss Audrey for her 1st
Easter. I made the egg below for her
mother when she was a little girl.
I think that's very special!
Miss Lis
This egg is for my Great Niece
Miss Ava's 1st Easter, her mother
loves blue and no frills!
Miss Lauren
Thank you ladies for all your kind
words, I'm glad you've enjoyed the
tutorials & stuck with me to the end!
I am way behind on dolls now.
~~~~~~~~~~~~~~~~~
Thursday, March 21, 2013
Decorating The Outside Of The Panoramic Sugar Egg
Now that the inside of the eggs are
hard and dry I can safely handle them.
This egg is for someone who loves pink.
hard and dry I can safely handle them.
This egg is for someone who loves pink.
I chose an assortment of flowers, leaves,
ribbons and a Happy Easter sticker. I cut a
square of paper and stuck it to the back of the
sticker so it wouldn't stick to my fingers.......
after I got it unstuck from the plate.
ribbons and a Happy Easter sticker. I cut a
square of paper and stuck it to the back of the
sticker so it wouldn't stick to my fingers.......
after I got it unstuck from the plate.
Those stickers are definitely sticky! !
I also need white frosting, one frosting
bag, wire cutters for cutting the leaves & flowers
to the appropriate length, scissors for cutting the
floral tape just in case the wire cutters don't do the
job, tweezers for inserting small flowers and 3 tips.
bag, wire cutters for cutting the leaves & flowers
to the appropriate length, scissors for cutting the
floral tape just in case the wire cutters don't do the
job, tweezers for inserting small flowers and 3 tips.
Big circle tip #12
Small circle tip #5
Small border tip #18
With the large circle tip I pipe a wide
section on the very top of the egg.
section on the very top of the egg.
Sugar paste dries hard and I can handle most
of the flowers with ease. However, the thin petals
of the roses are brittle. I handle those with care.
I generally start with 3 large roses. The largest in the
center with the 2 smaller roses to the side, placed
underneath the largest rose.
of the flowers with ease. However, the thin petals
of the roses are brittle. I handle those with care.
I generally start with 3 large roses. The largest in the
center with the 2 smaller roses to the side, placed
underneath the largest rose.
I cut each leaf and flower to the length needed.
Leaves can be bent to allow for the
curve of the egg.
With the small circle tip I pipe frosting
to secure the leaves and flowers.
Ribbons are a good filler for a space
that's too small for a flower.
I continue adding flowers, leaves and
ribbons until all the spaces are filled.
ribbons until all the spaces are filled.
Basically, I just wing it!
Then I do the same thing on the back.
frosting.
Time for the final piped borders.
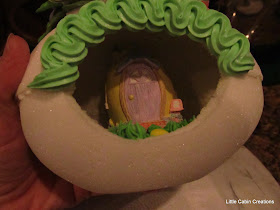
This egg gets a green border. Someone loves
spring green!
Large border tip #21

I pick up the egg to do the border of the
peep hole. I pipe the top half first. Careful to
completely cover the edge of the hole.
Then I do the bottom half.
Then the border all along the center of the egg.

My old hands can't pipe this in one continuous
line anymore, so I split it into 3 sections.
When I stop, I pull the tip to the very center
of the line, then begin again when the
cramping in my hand stops!

Oh, tuck the long ribbons under a flower!

You can see a stopping and
starting point just to the right
of center.

This one's done.

These eggs are not made to be eaten. Stored in an
airtight container and kept from sun exposure
they'll last for many years.
~~~~~~~~~~~~~~~~~~~~~
If you want an edible version, reduce the amount of
cream of tartar in the frosting so it's not so bitter
and make flowers with no wires. Make piped frosting
leaves. (very easy with a leaf tip) Decorate the inside
with jelly beans & a Peeps marshmallow chick.
I've put Matchbox cars, Polly Pockets, plastic
dinosaurs, even dollhouse furniture inside eggs.
My children seemed to enjoy breaking the egg to get to
the goodies inside far more than actually eating the egg.
~~~~~~~~~~~~~~~~~
This baby egg made from leftovers does have
a little vintage chick, but other wise
it's edible.

Drying yet again!
Bright colors, foo-foo frilly ribbons & plenty
of BLING!
spring green!
Large border tip #21

peep hole. I pipe the top half first. Careful to
completely cover the edge of the hole.
Then I do the bottom half.

My old hands can't pipe this in one continuous
line anymore, so I split it into 3 sections.
When I stop, I pull the tip to the very center
of the line, then begin again when the
cramping in my hand stops!

Oh, tuck the long ribbons under a flower!

You can see a stopping and
starting point just to the right
of center.

This one's done.

These eggs are not made to be eaten. Stored in an
airtight container and kept from sun exposure
they'll last for many years.
~~~~~~~~~~~~~~~~~~~~~
If you want an edible version, reduce the amount of
cream of tartar in the frosting so it's not so bitter
and make flowers with no wires. Make piped frosting
leaves. (very easy with a leaf tip) Decorate the inside
with jelly beans & a Peeps marshmallow chick.
I've put Matchbox cars, Polly Pockets, plastic
dinosaurs, even dollhouse furniture inside eggs.
My children seemed to enjoy breaking the egg to get to
the goodies inside far more than actually eating the egg.
~~~~~~~~~~~~~~~~~
This baby egg made from leftovers does have
a little vintage chick, but other wise
it's edible.

Drying yet again!
of BLING!
~~~~~~~~~~~~~~~~~~~~~~
I approach my sugar eggs the same way I
do my gingerbread houses. They're home
made, a joy to make and far from perfect. Not
a single perfect flower nor perfectly piped border
in the bunch, but through the eyes of a child when
they peek through the peep hole into that
miniature world................
it's confection perfection!
(I'll post some better photos of the finished eggs tomorrow.)


