Friday, July 27, 2012

A "Little Cabin" For Your Fine Hand Sewing

I have a little log cabin mold that I poured
 with pure beeswax.  It's the perfect
size for waxing you thread.
It's about 1 3/4inch by 1 3/4 inch.
It smells of honey.
Just perfect for your sewing basket!
If you hand sew, waxing your thread
prevents those horrid tangles!
Comes in a hand sewn aged linen sack,
tied with a vintage milliner's ribbon in
chestnut brown or old red.

Available at Early Work
Mercantile the 1st of August
and on my Accessories & Bits for
Sale Page

Thank You For Stopping By
Happy Sewing!

Monday, July 23, 2012

Brown Bag Molds-Dolls & Dinosaurs


My daughter and nieces
loved these dolly Brown Bag molds.
They enjoyed painting the
paper castings with watercolors,
as well as making, decorating,
and eating the cookies!
Dolly
Raggedy Girl Doll
Raggedy Boy Doll

The Dinosaurs were my
son's favorite cookies.  The heads
were always the first to be eaten!
 Stegosaurus
Tyrannosaurus Rex

Brown Bag molds are extremely durable. 
 You can literally bang the edge of the
mold on a wooden cutting board to release 
the cookie dough and they won't break. 

They are dishwasher safe too!
I only use natural non toxic materials
in the molds; 100% cotton linter, beeswax,
cookie dough, chocolate, cinnamon &
applesauce for pomanders.  I can make
a paper casting one day & a cookie the next.
 
I have enjoyed collecting and using these
molds since the early 1980's.
I found one the other day at a flea
market for only $2.00.  I was so
excited, it's one I don't have in my
collection.  A cute pig with a ribbon
around his neck.  I do love the hunt....
1986 Big Fat Pig 

I have added these to my paper
castings Brown Bag
Mold page.   

Thursday, July 19, 2012

A Little Ozark Sawdust Doll

When the first settlers arrived in this
 part of the Ozarks they found a land
of virgin forest and intermittent
prairies. Wood was used for almost
everything.  It not only heated their
 cabins it provided the logs to build them.
Oak bark rendered the acid for tanning 
their hides.  Ashes were used for soap 
making and hulling hominy.  Charcoal
was made for heating their forges.
Maple trees yielded sap for syrup.  Ash
was chosen to make grain cradles, white
oak for wagon parts, black oak for
 clapboards and hickory for tool
 handles.  Cedar was used for tubs,
 churns and buckets. White oak was
 used to make barrels and kegs.  The
Missouri walnut made strong beautiful
gun stocks and furniture.
 The first water powered sawmill in
Taney County was built in the mid
1830's on the Swan Creek.  By 1850
 most tributaries of the White River had
one or more mills.

Needless to say it's easy to imagine
that sawdust made it's way
into many early Ozark home made
dolls.  As an Ozark doll maker I think
its only fitting that I make the
occasional sawdust doll.  Over time I
think this type of stuffing won't last
as long as wool, and it's a favorite of
little mice, the very reasons these
early dolls didn't survive.  But, it does
make a lovely period doll. 
 
Louis Allen a very talented local wood
worker has been saving his aromatic 
cedar shavings for my dolls.
(hopefully bug resistant)
She smells so nice
but, she's a little hard & lumpy.
A simple stitched face.
Her simple cotton chemise and
 pantalettes are hand sewn with flat
 felled seams.
I chose this mid 1800's reproduction
print for her dress.  I have had this
fabric awhile, never quite finding
the right doll for it.  The color is a
red orange and soft blue on a cream
background.  It has a coarse old look
to it, although it feels smooth. 
Hand crocheted lace.
Antique china buttons in orange.
The perfect fit for this fabric.
Hook and eye closures.
Period hand sewn.
She's been aged to have that
well loved look.  Although it
doesn't show much in the photos.
Taney Butternut

One of my blogger friends
suggested I use the name Taney
for a doll.  Just perfect for a
simple sawdust dolly.  Why didn't
 I think of that!
( Who suggested that?)
Mary at Colony Mountain Stitcheries
Thanks for that wonderful
suggestion!!

She will be available at Early Work
Mercantile on the 1st of August.
(Taney has found a home in Texas)

History from "The Land of Taney"
By Elmo Ingenthron.

Tuesday, July 17, 2012

More Cirque Montage


We went to see the Cirque Montage show
that our daughter Leann and her dance
partner Simmone are a part of.   It was a
great show, if you get to Branson
don't miss it.
A very talented ensemble.

Great music.
Colorful costumes.
What a cute duo.
At this point in the show my Hubby
and I were getting a bit nervous.
I thought her Father was  
beginning to look rather unhappy.
Okay, when will this part be over?
 My jaw was beginning to hurt
from all the clenching!


My hubby was looking
rather pale...........
It was finally over.
 We survived.
It really was a great show!

Artist Bios

Cirque Montage

Leann Farley – Duo Aerial
Leann started taking dance class as a child and almost immediately started competing at dance competitions throughout the country. At the age of 15 she was picked out of many to be part of a Las Vegas based magic show. Since then she has been practicing magic with some of the biggest illusionists in the world, touring inside the country and overseas. For the past few years she has been the lead dancer and a production manager at the biggest magic show in the world, The Kirby VanBurch Magic Show. Last year she joined Yakov’s Moscow Circus in Branson, MO where she started to incorporate her dance and magic skills with circus art performance creating one of a kind lyra solo acts and she became a co-creator of a magnificent aerial art duo – Duo Artis, which has became the “most talked about” act in Branson, MO.
Simmone Gruzdev – Duo Aerialist
Simmone is a professional dancer, graduating from one of the most elite colleges of fine arts in North-West Russia, professionally trained in Ballet, Jazz, Modern, Ballroom and Folk dance as well as acrobatics and theater performances. He traveled the world for many years with The Russian National Theater dance group, learning new styles of dance and perfecting his stage skills. For the past 8 years he has been performing with the famous Russian comedian Yakov Smirnoff. Also, he was an original cast member of Yakov’s Moscow Circus Adventure where he got an opportunity to learn juggling and twirling cube. At the same time he joined Duo Artis and discovered something absolutely new for himself, aerial art performance, which has been called “…the most memorable part of the show” by Branson Tri-Lake daily news and has received tons of great feedback from raving fans.


Photo Courtesy of Meadows Images

Sunday, July 15, 2012

Bats In Our Belfrey??


This little guy has been coming to the cabin
for three years.  He makes his home between
 the floor joist underneath our back deck, always
choosing the very same spot.
He's a Missouri Brown Bat or Myotis Lucifugus.
He has plenty of insects to dine on here in the
woods, especially if we leave the porch lights on.
He can be seen going around and around the cabin.
We don't bother him and he doesn't bother us!


Monday, July 9, 2012

Doll Chemise With Gores and Flat Felled Seams

I recently did a post on making a dolly chemise.
with flat felled seams and a gusset.  This is how
you would add side gores to that chemise.
Here is the link to that post.
Finished side gore.
These are the pieces you would need
 to make the same chemise with flat
felled seams, gussets AND 
the addition of side gores.
This chemise is a straight chemise, more
typical of an early 1800's style.  Fabric came
in smaller widths, gores were added to give
 additional width to garments.
The gores should start about 1 inch below
the finished sleeve.  Make the top of the
gore 6/8 inch wide.  Follow the directions
from the prior post to the point where the
gusset is done and stop sewing.
Righ here!  Don't finish the side seam to the
bottom of the chemise.
Lay one gore next to the left front
side of the chemsie. ( we
are using a 3/8 in. seam)
Right sides are up.
 Pin WRONG sides together.
REMEMBER.............. 
A flat felled seam is sewn on the top
side of your garment.  Stitch together
 with the top of the back stitch, on the
 top of the chemise.
Sorry, I didn't mark this with the
marker.
Front section of gore is sewn on.
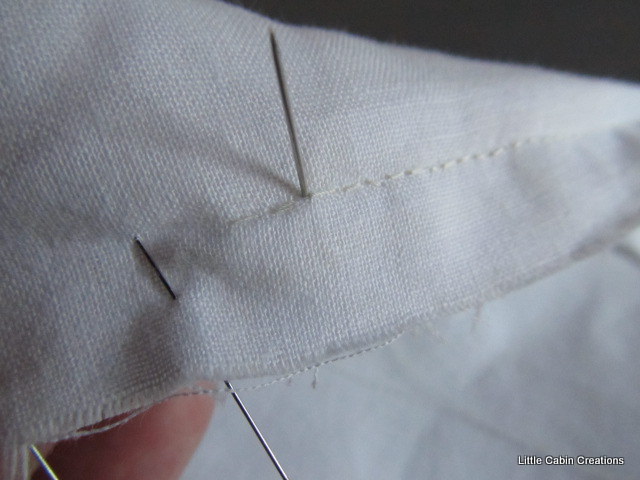
Pin the back section of the gore to the
 back section of the chemise.
 Wrong sides together. 
I have marked a blue line on the top
of this section.
You will be stitching on this line.
This is what the point of the gore will look like.
You can see the back side of the stitch on the
first side.
Sew this back section of the gore.............
Start by bringing your needle up from
 beneath, sew with the top of the
back stitch on the blue line. 
Trim the side of the seam that is the farthest
 back on the chemise. 
(The side that has the back of the stitch showing)
Trim all the way to the bottom of the chemise.
Fold the remaining side of this seam toward
the back of the chemise.
Time to finish the side seam of the chemise,
beginning at the top of the gore, finishing
just below the arm where you previously
stopped. 
Insert you needle right at the point where the
gore seams meet.
Come out on the top front of the chemise
and sew up toward the sleeve, until you
come to the previous stopping point.
Be sure to line up the front and back of
the chemise nicely.
The side seam is now complete. We just
need to feld the gore and side seam.
Feld the seam that is folded over.
Trim the inside of the remaining seam.
(The side that has the back of the stitch)
 All the way up to just below the sleeve where
you stopped trimming earlier,
and all the way to the bottom of the chemise.
Fold over the entire side seam and feld.
Start just below sleeve, easing over the prior feld,
all the way to the bottom of the chemise.
This side is done................
Both felds fall toward the back of the
chemise.
Now hop on over to the other side
and do the same thing again.
Again, you can mirror your sides
if you choose.
Finish the hems on the sleeves and
bottom of the chemise, you are
DONE!

Here are a few photos of gore
insertion on a different chemise.
 This chemise does not have gussets.
These felds fall toward the side of the chemise.
 I have mirrored the other side. 

Happy Sewing!